Research and diagnostics go hand in hand. While research supplements diagnostics, diagnostics is one of the direct applications of research. Having said that, there are several techniques, which are commonly used for similar applications in both the fields. One such technique is the enzyme linked immunosorbent assay (ELISA). This technique was conceptualized and developed by the Swedish scientists Peter Perlman and Eva Engvall in 1971 as an improvement to the already established radioimmunoassay. In this article, we shall discuss the standard protocol followed for ELISA and also some troubleshooting techniques for commonly occurring difficulties. Before we get into these details let us briefly discuss what ELISA is and the different types of ELISA.
WHAT IS ELISA?
ELISA is a qualitative and quantitative immunoassay which uses the reaction between an antigen and an antibody. ELISA has the following components:
- An antigen: This is usually the molecule of interest which is to be identified or quantified.
- An enzyme-linked antibody: This is an antibody against the antigen of interest. To this antibody an enzyme is conjugated.
- A chromogenic substrate: In the presence of the conjugated enzyme, this substrate undergoes a reaction leading to some kind of a colour change or fluorescence.
During the detection phase, it is the intensity of this coloured reaction or fluorescence that is measured to quantitatively determine the level of the molecule of interest.
It is important to remember that there are several iterations of ELISA and with each iteration, the components may vary slightly. But the basic principle remains the same – an antigen-antibody reaction is quantified. The images below depict some of the types of ELISA:


(Image Source: https://elisa-kits.de)
SANDWICH ELISA
The Sandwich ELISA is the most widely used type of ELISA because of its high specificity, flexibility and sensitivity. In this technique two types of antibodies are used:
- Immobilized antibody/Capture antibody: This antibody is immobilized onto the surface of the 96-well plate. It is specific to one epitope of the antigen of interest.
- Detection antibody: This antibody binds to another epitope on the antigen of interest. It is conjugated to an enzyme.
PROTOCOL FOR SANDWICH ELISA
| Phase 1: Antibody Immobilization | ||
| (a) | Addition of the capture antibody
The capture antibody is diluted and pipetted into the wells of the microtiter plate. The plate is then incubated for the antibodies to bind to the surface of the wells.
Note: Remember to incubate the plate at the correct temperature without any disturbances to ensure optimal binding. |
 |
| (b) | Washing
The plate is washed using a wash buffer to remove all the unbound antibodies. |
 |
| (c) | Blocking
In this step, a blocking buffer is added to the wells to block all the unbound sites on the wells. |
|
| Phase 2: Dilution of standards and samples | ||
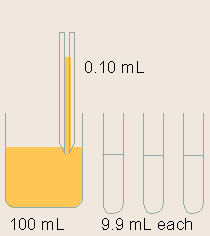
| (a) | Dilution of standards
Standards are serially diluted. This step is very important for the generation of a proper standard curve, which is the base for the ELISA quantification.
Note: Serial dilution is best done using the same pipette tip throughout the dilution process to ensure uniformity. Also remember to mix the samples thoroughly at each step. |
 |
| (b) | Dilution of samples
Samples must be diluted using an appropriate sample diluent buffer.This is done so that the concentration of the sample fits within the linear range of the standard curve.
Note: Remember to process all biological samples in the required manner such that there is no interference from extraneous particles. |
|
| Phase 3: Addition of sample and standards to the wells of the microtiter plate | ||
| (a) | The samples and the standards are added to the plate carefully.The antigens in the sample bind to the bound capture antibody.
Note: Remember to change the pipette tip after addition to each well to prevent any cross contamination. It is also advised to not let the pipette tip touch the plate during addition. |
 |
| (b) | The plate is incubated to allow complete antigen-antibody binding. Following this, the wells are washed with a wash buffer 2-3 times to ensure the removal of any unbound antigen.
Note: Washing is an important step, which prevents false negatives. Care must be taken to completely remove the wash buffer after each wash. Tap-drying the plate onto tissue paper is a good technique to completely remove the fluids. |
 |
| Phase 4: Addition of the enzyme conjugated antibody | ||
| (a) | The enzyme conjugated antibody is added to the wells. This antibody will bind to another epitope on the target antigen (which is already bound to the capture antibody).
Note: During this stage it is advisable to use a multi-channel pipette as it would ensure uniform and quick addition of the reagent. |
 |
| (b) | After an incubation, the plate is washed with a wash buffer to remove the unbound enzyme conjugated antibody. | |
| Phase 5: Addition of the chromogenic substrate | ||
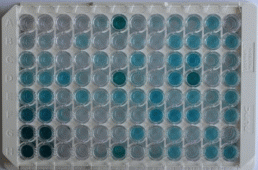
| (a) | The chromogenic/fluorescent substrate is added to the wells. This substrate is specific to the enzyme which is conjugated onto the antibody. Addition of the substrate leads to a coloured reaction or generation of a fluorescence as the result of the enzyme catalyzed reaction. The plate must again be incubated till the reaction is complete.
Note: This step is highly sensitive and since it is a colour/fluorescent reaction it is advised to cover the plate such that it is not exposed to light. |
 |
| Phase 6: Addition of the stop solution | ||
| (a) | A stop solution is added to all the wells. This solution is usually acidic and simply stops the enzyme catalyzed chromogenic/fluorescence reaction.
Note: This step must be done as quickly as possible to ensure uniformity in time across all the wells. It is also important to take extra care for personal protection as the reagent is acidic. |
 |
| Phase 7: Measurement of absorbance/fluorescence | ||
| (a) | Based on the type of reaction, absorbance/fluorescence is read using the spectrophotometer or other such devices.
Note: It is advised to take the readings immediately after addition of the stop solution. |
 |
| (b) | Based on the readings obtained from the standards, a standard curve is generated. |  |
| (c) | This standard curve is used to extrapolate the concentration of the antigens present in the sample. | |
There are a few general precautions which must be observed while performing ELISA:
- While using kits ensure that all the reagents are stored as per the manufacturer’s instructions. This will prevent any kind of degradation.
- The workspace must be cleaned thoroughly before placing the microtiter plate or any of the reagents.
- Ensure that all the incubation periods are strictly followed to prevent any variation across experiments.
- While preparing the standards make sure that pipetting is done with a steady hand.
- Always use molecular grade water or dilutions and preparation of reagents.
- Always wear gloves to prevent any contamination.
- Addition of samples and standards in duplicates is always better to ensure high quality of results.
ELISA is a highly sensitive and efficient technique which can detect even very small quantities of target proteins. It has also been scaled up to accommodate a very large sample volume for suiting rapid diagnostic needs. Studies are also being done to adapt ELISA to nanoscience technology.
ELISA has gained so much popularity that it forms the cornerstone of most modern day research and diagnostics. With constant innovations pushing the boundaries of the technique, the future of ELISA also looks quite bright.
References:
- https://www.novusbio.com/support/support-by-application/elisa/illustrated-assay.html
- https://www.genfollower.com/8-tube-strip-detachable-elisa-plate/
- https://embryology.med.unsw.edu.au/embryology/index.php/ACPS_Seminar_2014_-_Implantation
- http://biologyclermont.info/wwwroot/courses/oldlab1/old%20m1%20yeastplate%20intro.htm
- https://microbeonline.com/direct-elisa-test-for-antigen-detection/
- https://www.researchgate.net/figure/Schematic-of-a-typical-sandwich-immunoassay-The-following-steps-are-required-1_fig3_326418223
- https://www.cloud-clone.us/elisa/ELISA-Kit-for-Human-Platelet-Derived-Growth-Factor-Beta-Polypeptide-PDGF-b-1044.htm
- https://laboratoryinfo.com/elisa/
- https://microbenotes.com/sandwich-elisa-steps-and-advantages/
- https://laboratoryinfo.com/elisa/
- https://www.mybiosource.com/learn/ELISA
- https://www.lsbio.com/products/elisakits/cellbased
- https://www.ultralabealtd.co.ke/elisa-reader.php
- https://www.studyread.com/types-of-elisa/
- https://elisa-kits.de/de/elisa_method


")


